Posted on

Jack-O-Planters

This is a fun Halloween project for gardeners! It’s silly and quirky, and it puts a smile on everyone’s face. Turn your Jack-o-Lantern into a Jack-o-PLANTern this year for a fun garden therapy project using these simple DIY instructions.

How to Make Jack-o-Planterns cute but a little creepy!

Making your own is a really simple project. Heading out to a garden center will be the most time consuming and, might I add, dangerous. You will have to show some restraint if you don’t want to come home with a carload of colorful grasses, kale, and other fall beauties.


How to Make Jack-o-Planterns a jack-o-lantern planter!

Materials:

Pumpkin
Soil
Grasses, cabbage, Sedum, & ornamental kale
Marker
Knife
fall planter
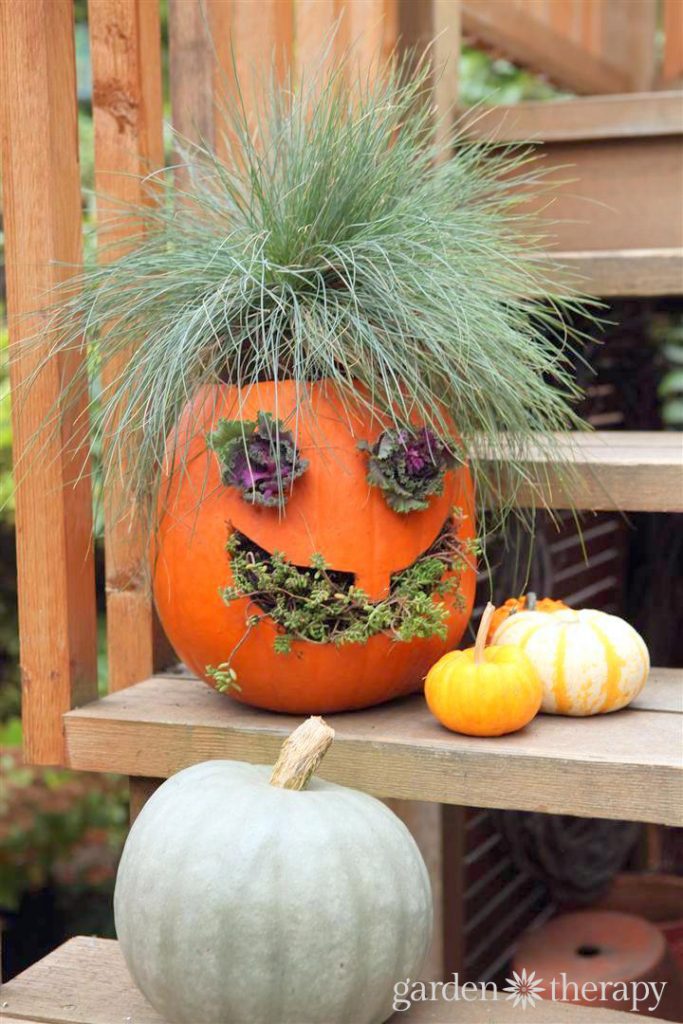
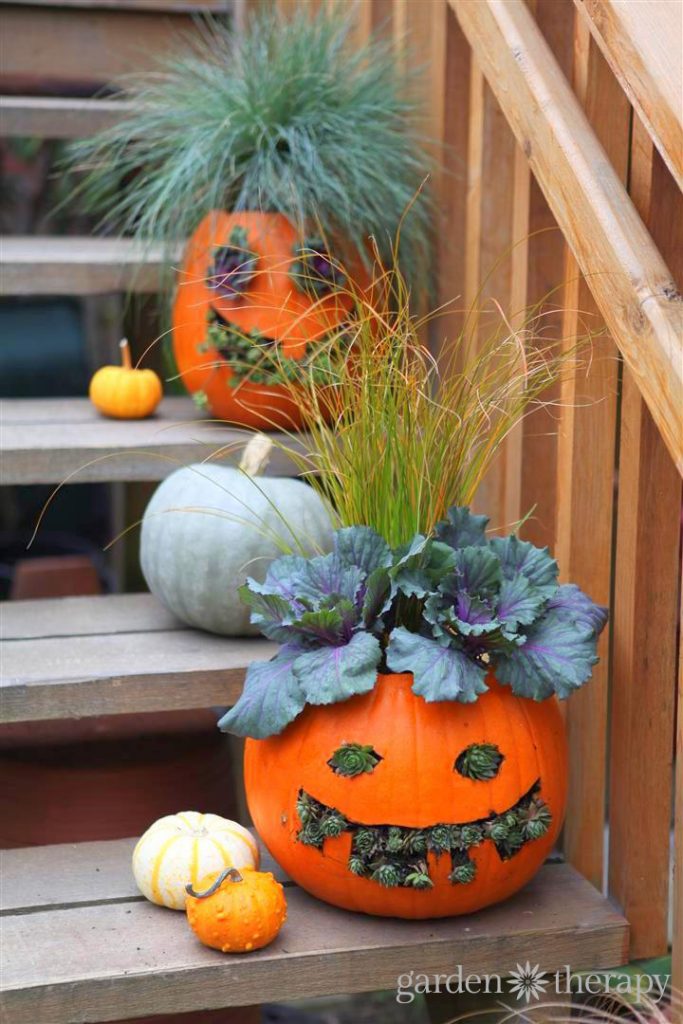
1. Cut the top off your pumpkin to make a hole in the top. If it is fairly empty, then you don’t need to spend a bunch of time scooping it out. I removed the seeds and roasted them and left the rest of the junk in there. It will all compost together in the end anyhow. Use you marker to draw a face on the best side of the pumpkin and use the knife carve out the holes.

2. Now add some soil to the bottom of the pumpkin. You can use a container mix soil, although I just used SEA SOIL original which is pure compost. I found that my plants had quite a bit of container soil in them and I didn’t really need to add much more in the way of peat moss or perlite. Contrary to typical container planting instructions, you really want to pack the soil down at the bottom to create some firm areas where the plants can sit. These planters will not last long enough for the roots to struggle and will have lots of moisture and organic matter from the pumpkin itself. I also don’t think drainage holes are necessary but add them if you choose.

3. Now for the fun part (it is even more fun than carving a jack-o-lantern)! Plant some ‘hair’ with grasses…

…and ‘hats’ with cabbage.

Fill soil around the roots of the plants (remove the plastic pots) and pack it in through the eyes and mouth. Leave space for sedum and ornamental kale as eyes and teeth.

I tried swapping out the kale and sedum in different jack-o-lantern eyes until I got the look that I liked.

4. Now set your pumpkin out in the cool fall air and water periodically. After Halloween, remove the plants and make a pretty fall planter or use them to pretty up the garden.

Compost the whole pumpkin and the soil and you will be well on your way to a greener garden next year.

How to Make Jack-o-Planterns creative pumpkin plantersHow to Make Jack-o-Planterns and how to make them last until Halloween!

Posted on

Ginger

Gingers are one of the most beautiful and colorful flowers in the world of flowers. Botanically, Ginger is a rhizome of the perennial herb which is indigenous to the South west coast of India and the Malabar coast of the state of Kerala. Gingers, a multifaceted herb,enjoy a special position in the botanical kingdom with their elegance in form, texture, sparkling color, and amazing symmetry. The word ginger conjures up images of an exotic oriental food flavoring; however, edible ginger – Zingiber officinale, is only one of approximately 1,300 species of the very diverse Zingiberaceae family

Image may contain: plant, flower, nature and outdoor
Posted on

Eye On The Prize


Image result for squirrels in trees


Eyes On The Prize
“Focused, hard work is the real key to success. Keep your eyes on the goal, and just keep taking the next step towards completing it. If you aren’t sure which way to do something, do it both ways and see which works better.”
— John Carmack

This perky fellow was posting a lookout in the branches of a tree above one of the bird feeders in my backyard, trying to judge when it was safe to try his hand at raiding the feeder (again). As I’ve mentioned before, these crazy red fox squirrels put on quite an entertaining show as they try to scam birdseed (they like the sunflower seeds the best) from the bird feeders. The antics and acrobatics involved can keep one constantly entertained. 🙂

Posted on

Sunday Surprise

Best Summer Berry Trifle

Berry trifles are wonderful summer desserts — they’re simple, gorgeous and you can make them ahead of time. Here’s the key to making them taste as good as they look: don’t use imitation whipped cream, instant pudding or store bought cake! No need to make everything from scratch either. After many trials, I discovered three cheats for making a delicious and easy trifle: (1) store bought lady fingers are just as good (in fact, better) than homemade cake, (2) an easy cream cheese-whipped cream filling makes an excellent substitute for homemade pudding, and (3) tossing the berries with a good quality raspberry jam enhances the fruit flavor and creates a delicious syrup that melds the trifle together. This one is perfect for the 4th!

Servings: 8-10
Prep Time: 25 Minutes
Total Time: 25 Minutes, plus at least 8 hours to chill

Ingredients

  • 3/4 cup (8 oz) seedless raspberry jam
  • 1 quart (1-1/2 pounds) strawberries, hulled and cut into 1/4-inch slices
  • 1 pint (12 oz) raspberries
  • 1 pint (12 oz) blueberries
  • 16 ounces cream cheese (preferably Philadelphia brand), at room temperature
  • 1-3/4 cups confectioners’ sugar
  • 1-1/2 cups heavy whipping cream, cold
  • 1 teaspoon vanilla extract
  • 1 (7 oz) package crisp lady fingers (also called savoiardi biscuits)
  • Fresh mint spring, for garnish (optional)

ingredients

To begin, warm the raspberry jam in the microwave. Toss it with the berries and let it sit while you prepare the rest of the trifle.

berries-and-jam


Beat the heavy cream until stiff peaks form, then set aside.

whipping-cream


In a large bowl, beat together the softened cream cheese and Confectioners’ sugar.

cream-cheese-and-sugar


Add the vanilla and beat until smooth and creamy.

beating-in-vanilla


Beat in a third of the whipped cream, then add the rest to the bowl and fold in with a large rubber spatula.

folding-in-whipped-cream


To assemble the trifle, begin by layering the lady fingers in the bottom of the trifle dish.

lady-fingers


Top with a third of the berry mixture.

fruit-layer


Followed by a third of the cream.

cream-layer


Continue alternating until all of the ingredients are used up, ending with the cream.

lady-finger-layer


Let the trifle chill for at least 8 hours, then top with some fresh berries and a spring of fresh mint, if desired.


 Summer-Berry-Trifle-1