Posted on

Propagating Succulents

Propagating Succulents

How to propagate succulents from cuttings and leaves.

Propagating succulents via Needles + Leaves. Learn how to propagate succulents from leaves and cuttings.

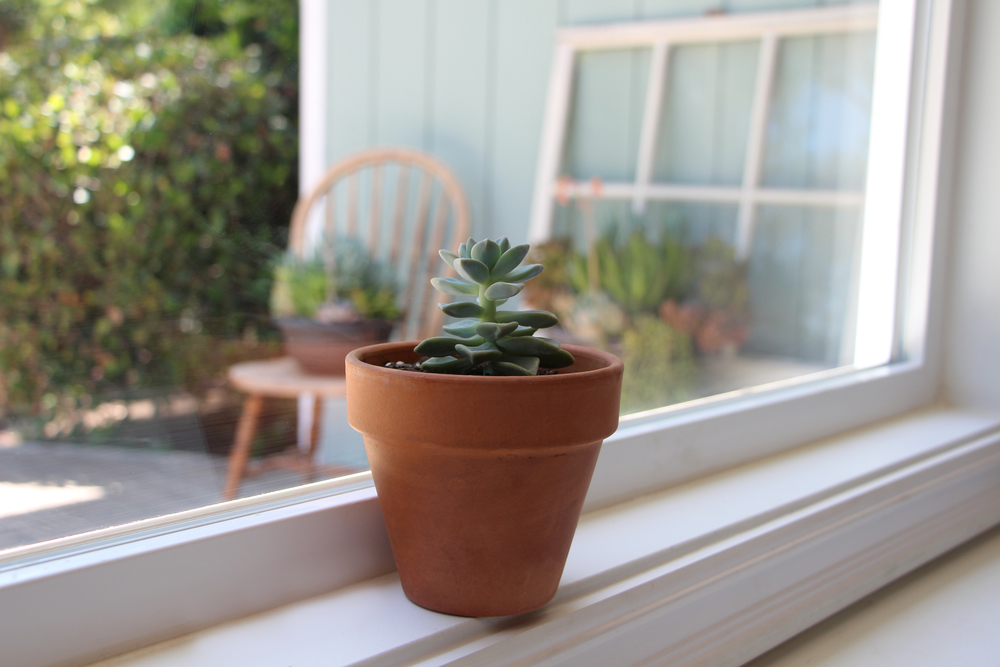
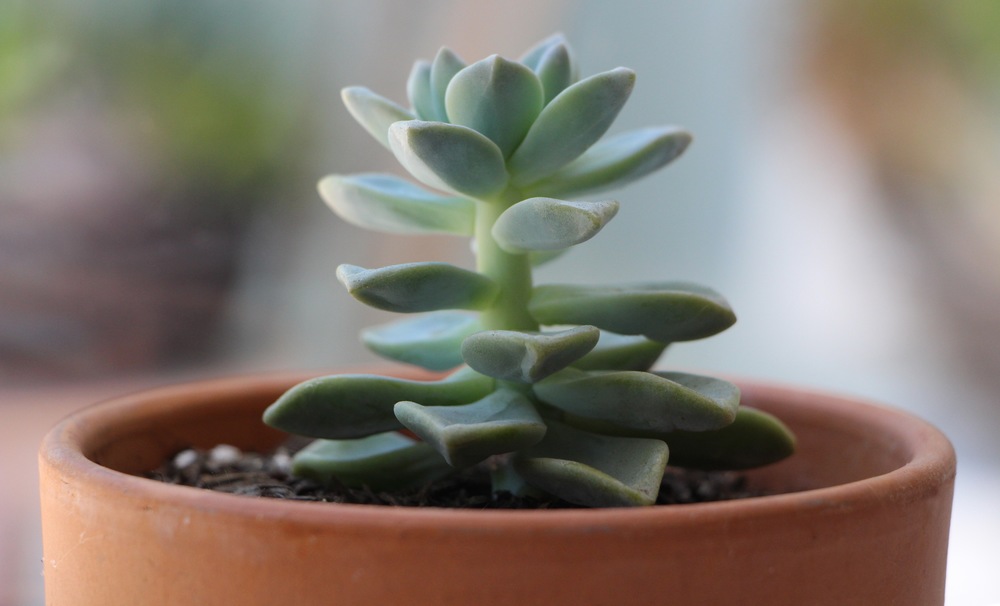
If you’re anything like me, you probably love to have succulents in the house. I try to keep them in bright windows that get plenty of light, but sometimes they can still get leggy. This happens when a plant isn’t getting enough light and it starts to stretch out causing the stem to grow long and the leaves to become widely spaced.

Notice the long stem and widely space leaves.

If you have a plant that is starting to become leggy like this one, have no fear!  This is the perfect time to propagate!

Gorgeous Succulent Plant: Propagating Succulents via Needles + Leaves. Learn how to propagate succulents from leaves and cuttings.

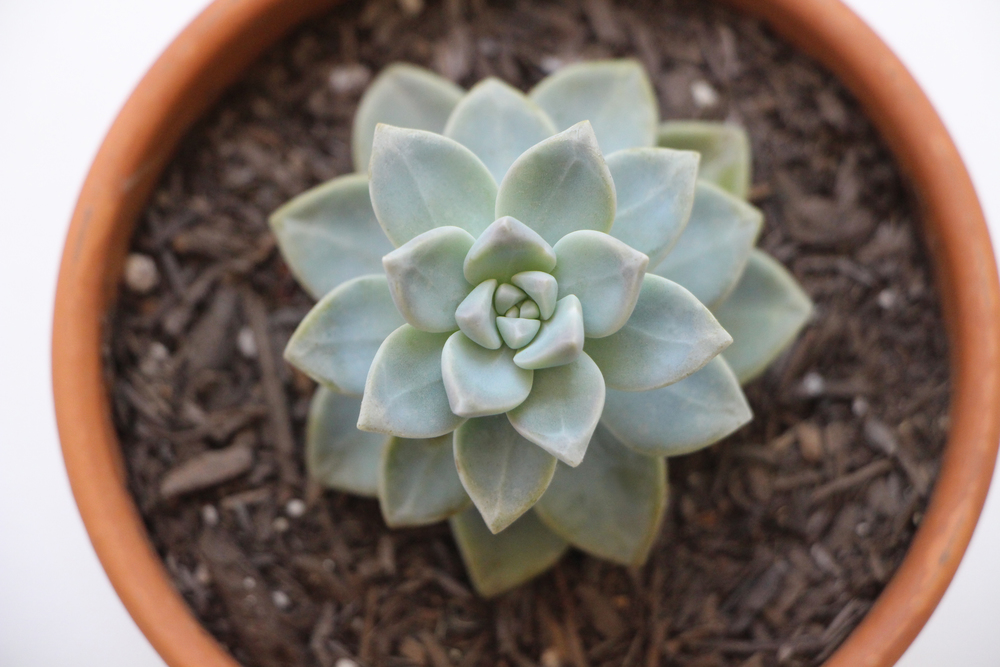
Although this plant still looks gorgeous from the top, the lower leaves will begin to wither and fall off and soon we’ll be left with a rosette high above the soil on a long bare stem.  So before the leaves start to die, let’s pull them off and propagate them to make more plants.  Succulent propagation is easy, fun, and free!

Removing succulent leaves: Propagating Succulents via Needles + Leaves. Learn how to propagate succulents from leaves and cuttings.

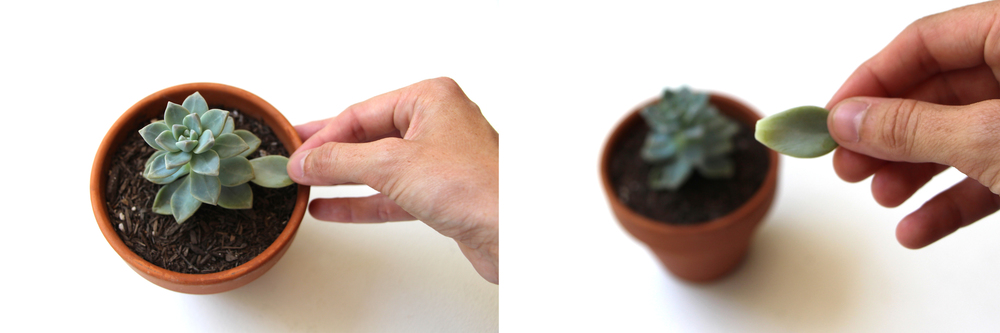
We’ll start by removing the lower leaves first. Be really careful when you remove the leaves from the stem.  I hold the leaf firmly and wiggle it from side to side until I feel a little snap.  You want to be sure you get the entire leaf.  If you rip the leaf, leaving the base still attached to the stem, it will not be able to grow roots or a new plant.

Succulent Leaves: Propagating Succulents via Needles + Leaves. Learn how to propagate succulents from leaves and cuttings.

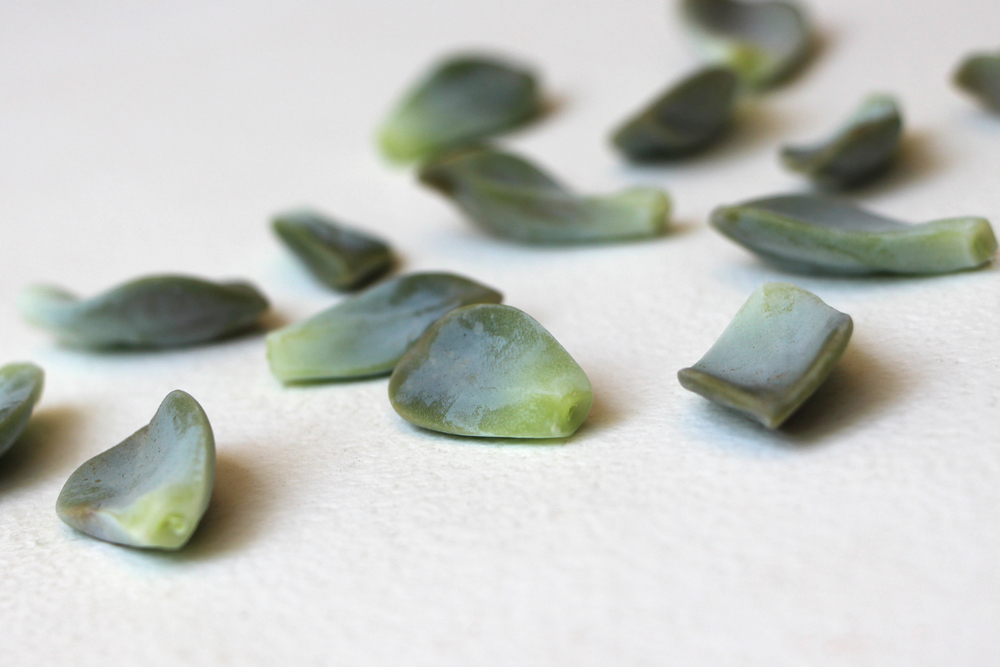
This is what the leaves will look like if they are properly pulled from the stem remaining fully intact.

Propagating Succulents via Needles + Leaves. Learn how to propagate succulents from leaves and cuttings.

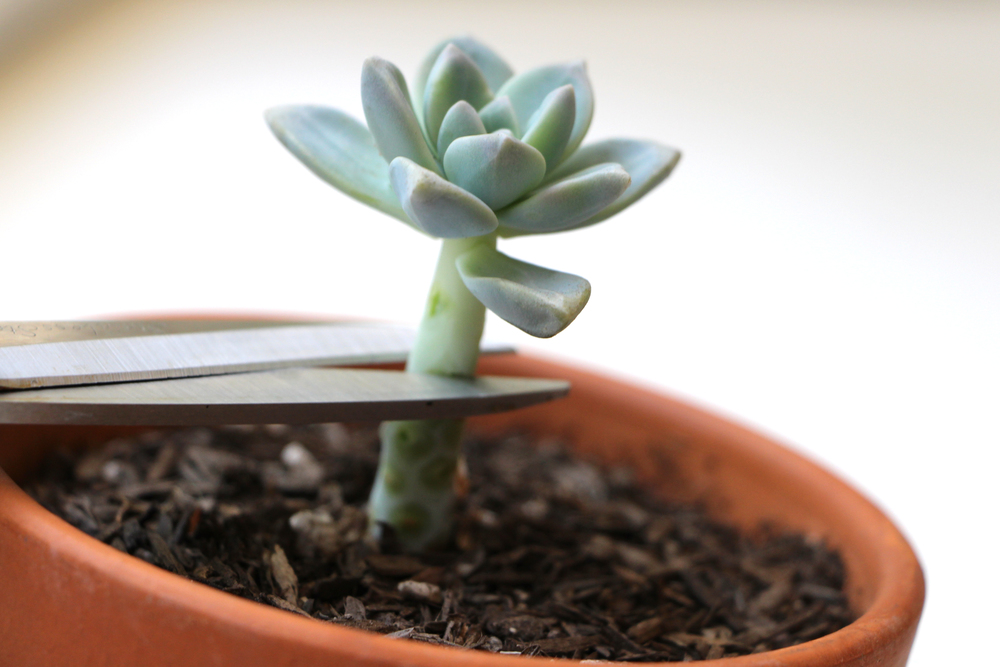
After you have successfully removed the lower leaves you will be left with a small rosette on a long bare stem.  I like to call the next step decapitation propagation. Not sure if that’s the technical term, but it rhymes and we’re going to cut its head off so…

Propagating Succulents via Needles + Leaves. Learn how to propagate succulents from leaves and cuttings.

I use a pair of craft scissors, but a sharp knife would work great as well.


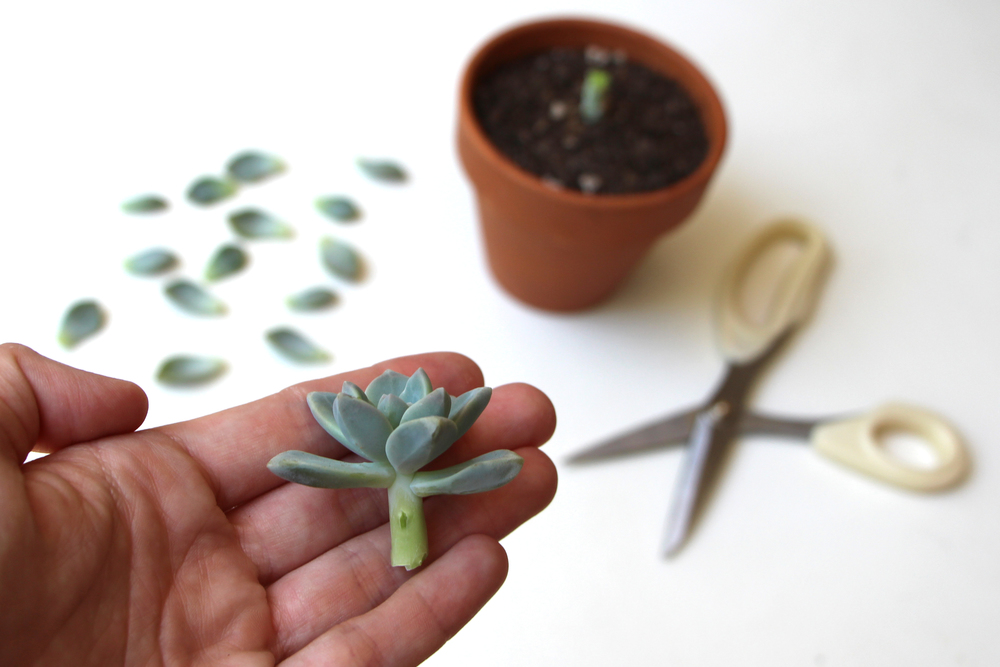
We now have a bunch of leaves, a stump and a cute little plant with a short stem.

Succulent and Leaves: Propagating Succulents via Needles + Leaves. Learn how to propagate succulents from leaves and cuttings.

Now we wait. Before we can place our leaves on soil to begin growing new plants we must let the ends dry out and callous over.  This step is vital! If you don’t let the ends dry out and place them directly on soil they will absorb too much moisture and they will rot and die.  In addition to letting the leaves callous over, we must also let the end of the stem on the rosette dry out as well.  This could take anywhere from a few days to a week or so.

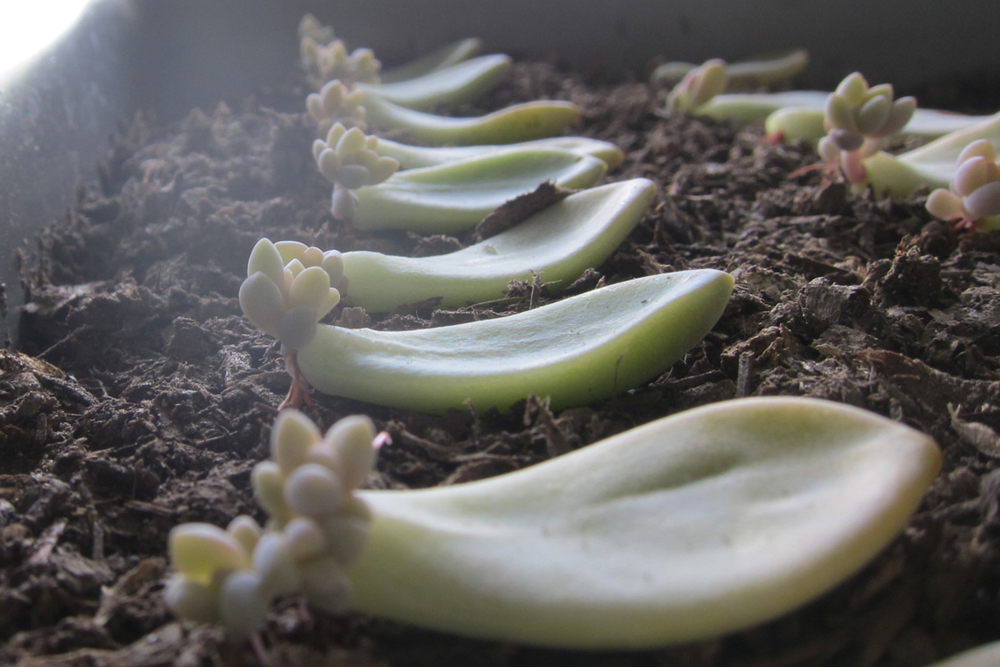
Once you feel like the ends are dry enough, you can place them on top of some well-draining cactus or succulent soil. (Some people dip the ends in a rooting hormone, but I’ve never tried this and have had great success without it.) I’ve had the best results when keeping my leaves indoors in a window with lots of indirect sunlight.

After a few weeks you will see little pink roots sprouting from the ends of the leaves and then teeny tiny baby plants will begin to grow. I water the leaves very rarely until I start to see roots or babies appearing.

At this point I will give the roots or baby plants a good soak about once a week or whenever I notice the soil is totally dry.  Just like with a fully developed succulent, too much water is not good. If you want to be certain not to over water, I recommend spraying the ends of your leaves with a spray bottle once a day instead of completely soaking the soil.

Propagating Succulents via Needles + Leaves. Learn how to propagate succulents from leaves and cuttings.

Propagating Succulents via Needles + Leaves. How to propagate succulents from leaves and cuttings.

Propagating Succulents: Learn how to propagate succulents from leaves and cuttings.

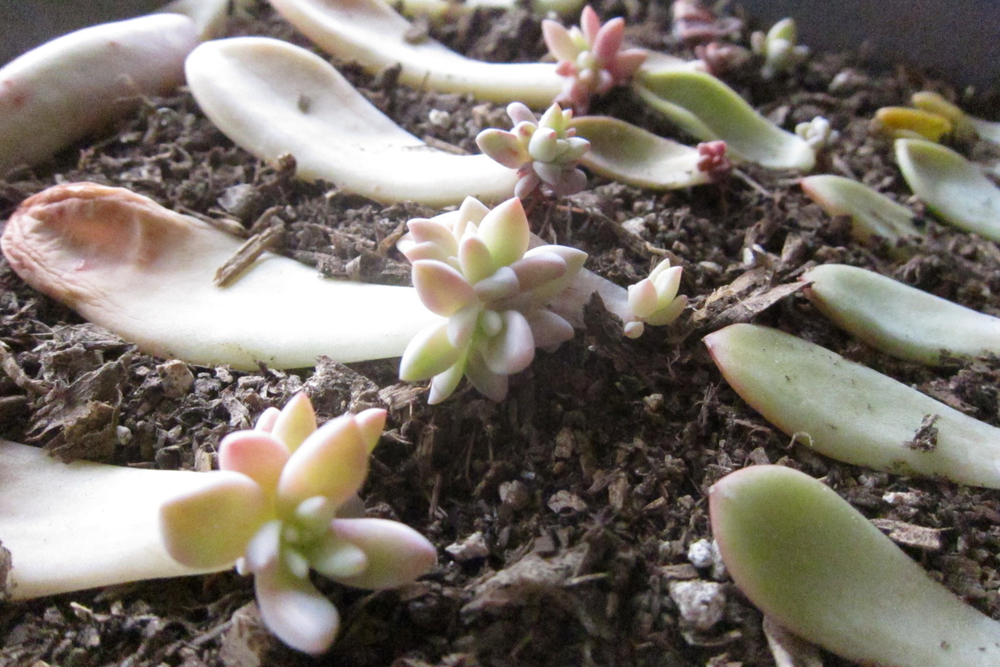
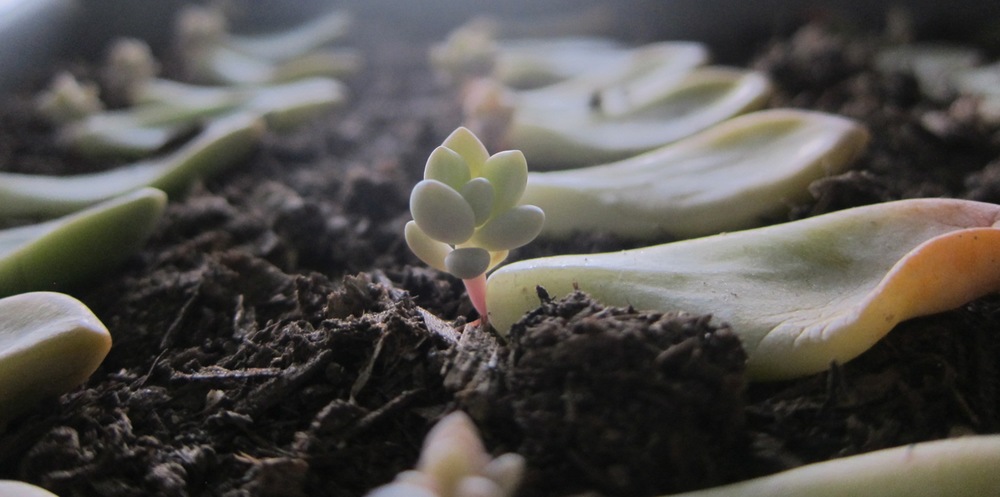
I let my baby plants grow in rows like this until I start to notice the “mother leaf” starting to wither.  At that point I will carefully remove the leaf in the same fashion I removed it from the original stem, and then place the baby plant in its own pot. This can be tricky as you don’t want to accidentally remove the roots with the leaf, so you may want to play it safe and let the leaf fall off on its own.

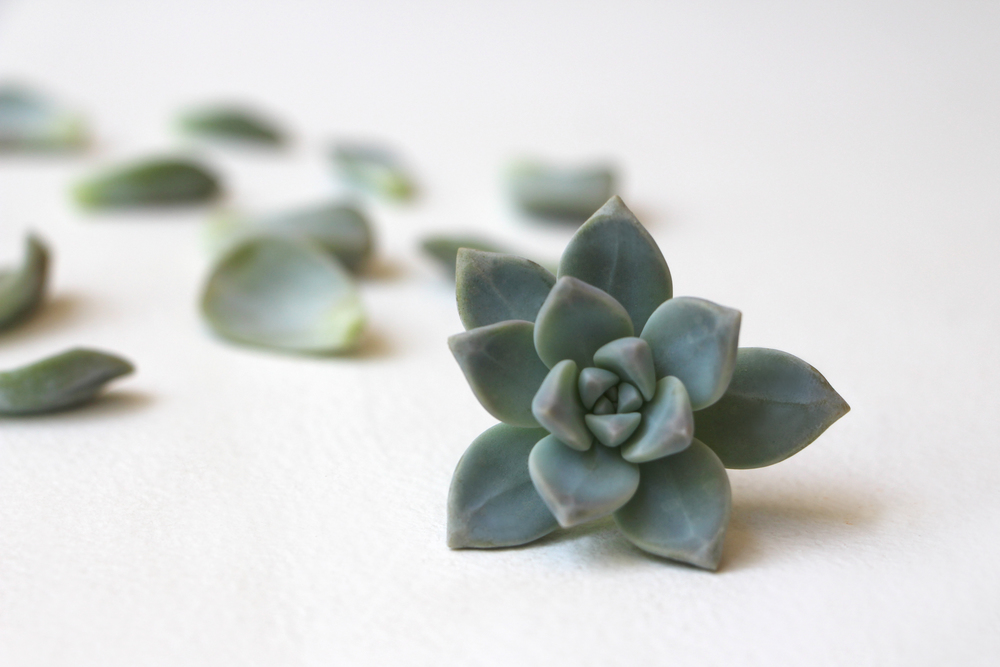
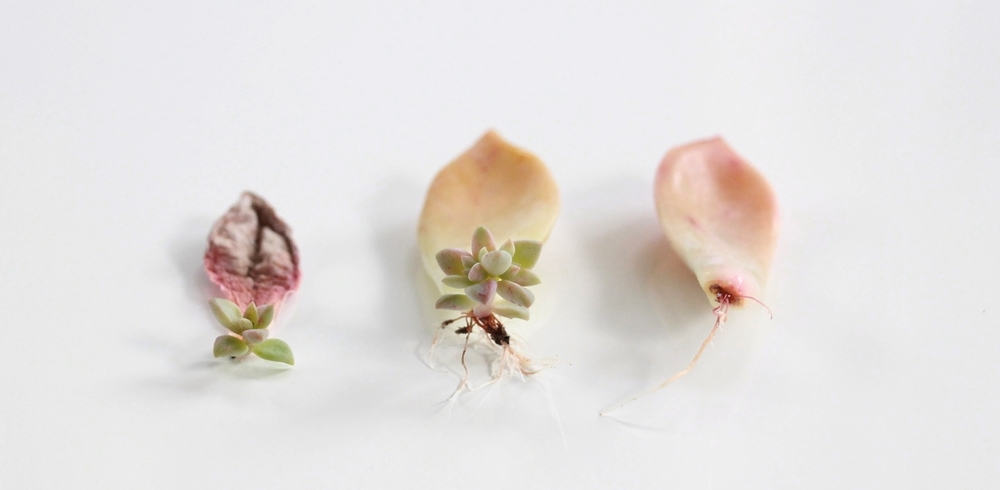
Keep in mind, not every leaf will grow a new plant.  I’ve found that some leaves just wither away, some will take root while never growing a new plant, and some might even grow a plant, but never root. Although there will typically be a small amount of losses, most leaves will grow roots followed by a new plant.  The three leaves below were all started on the same day and all three had different outcomes.

how-to-propagate-succulents-from-leaves-and-cuttings-needlesandleaves_net.jpg

Baby Succulents: Propagating Succulent via Needles + Leaves. Learn how to propagate succulents from leaves and cuttings.

I ran out of individual little pots with this batch so I just removed the leaves as they withered and left the plants to grow together like a little succulent forest.

Okay, back to that stump. Don’t worry no part of this plant is going to go to waste!

Succulent Stem: Propagating Succulents via Needles + Leaves. Learn how to propagate succulents from leaves and cuttings.

Propagating Succulents via Needles + Leaves. Learn how to propagate succulents from leaves and cuttings.

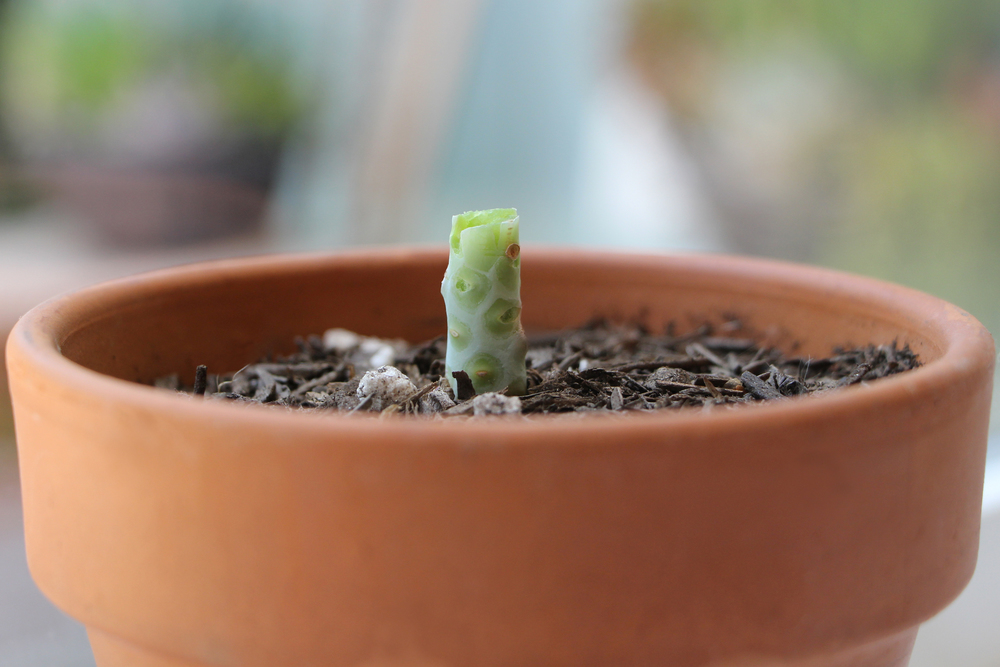
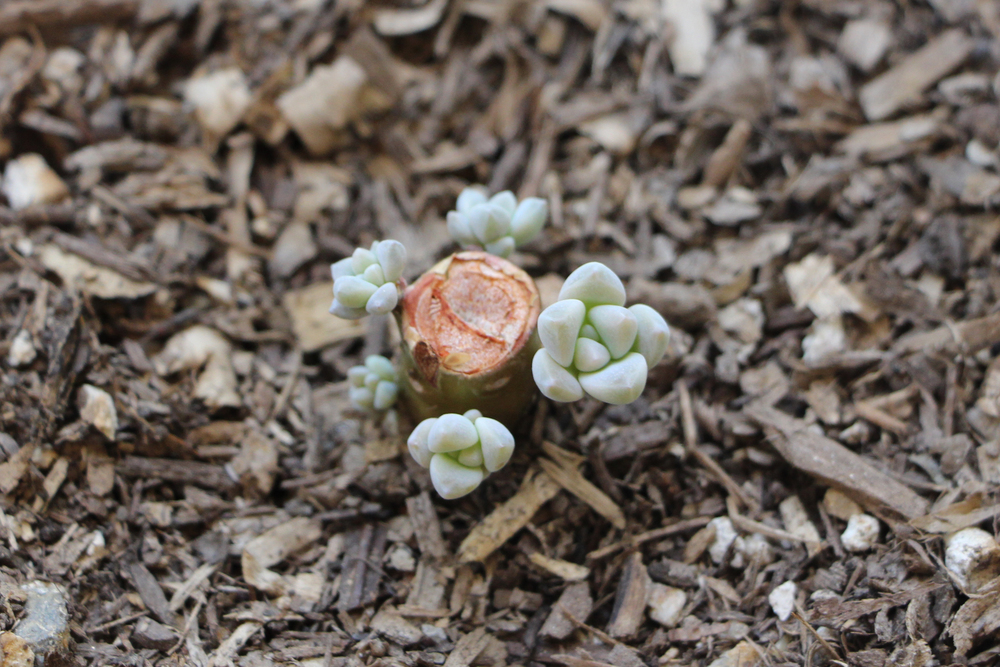
Simply put this pot aside and eventually it will begin to sprout new plants from each place we removed a leaf!

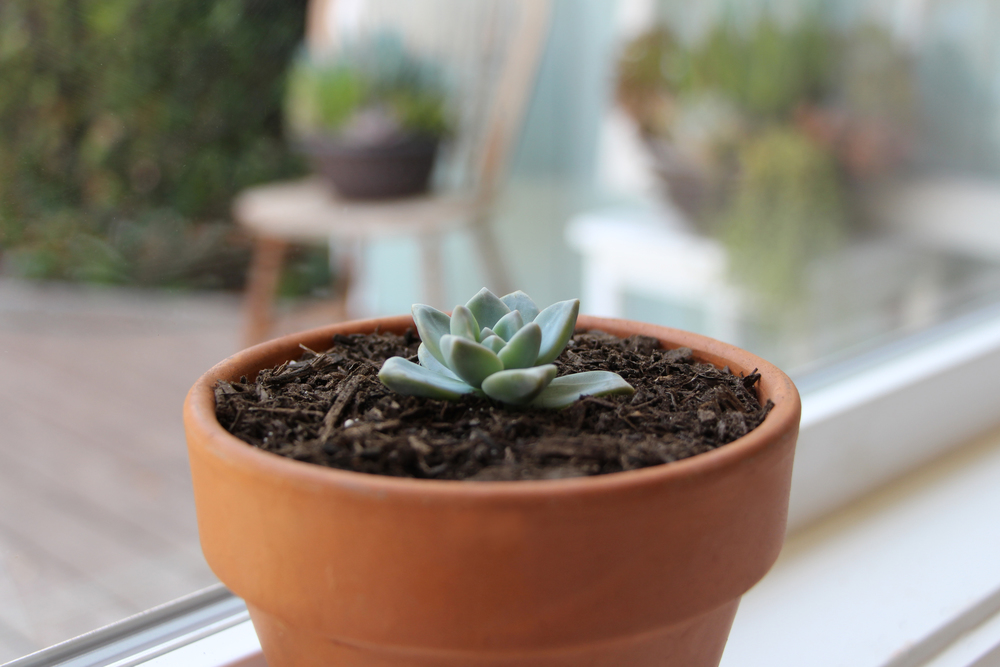
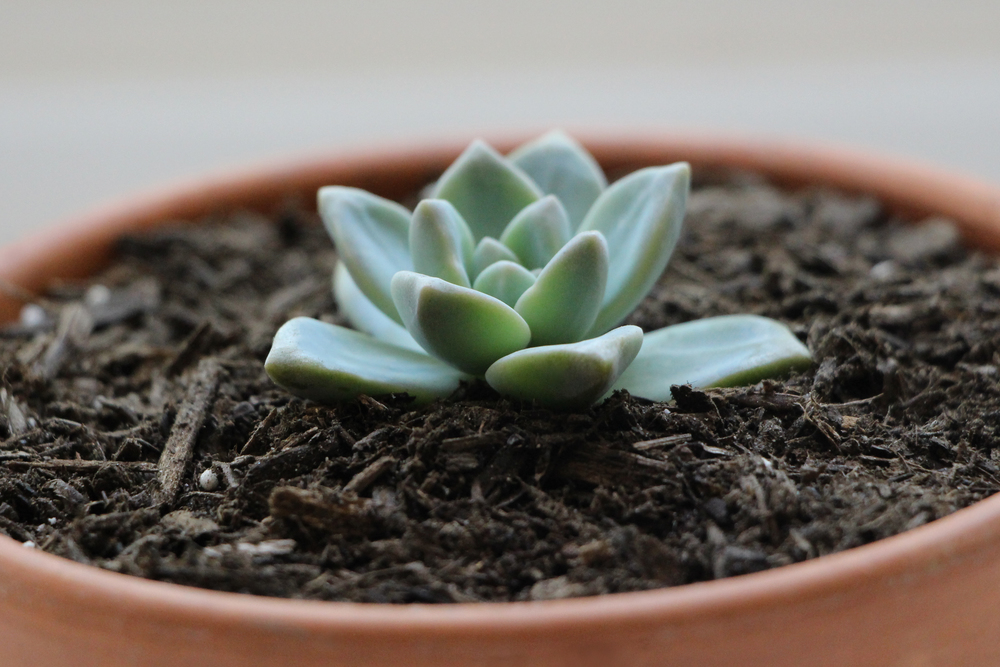
Now back to our original plant, the reason we did all this!  Once the stem has dried out and calloused over, simply place your plant back in a pot with well-draining cactus or succulent soil and it will grow roots again and continue to flourish! Isn’t succulent propagation amazing?

Propagating Succulents via Needles + Leaves. Learn how to propagate succulents from leaves and cuttings.

Propagating Succulents via Needles + Leaves. Learn how to propagate succulents from leaves and cuttings.


All of my information comes from personal experience.  I’m sure all succulents propagate differently and plants in different climates and environments require different care. This is what has worked for me and I hope it works for you!

Posted on

Cornucopia

Much like the turkey, cornucopias are a staple at the Thanksgiving table. But, where did these horned vessels overflowing with goodies come from?

Cornucopias have a surprisingly rich history, going all the way back to 5th century BC. The mouthful of a name derives from two Latin words: “cornu,” meaning horn and “copia,” meaning plenty. That’s why cornucopia and horn of plenty are often used interchangeably; we prefer cornucopia because it’s just plain fun to say.

Originally, the cornucopia was made of a real goat’s horn and filled with fruits and grains and placed in the center of the table. So, what’s with the goat’s horn? Well, the Greek legend states that Zeus, the Father of Gods and men, had to be banished to a cave so his cannibal father didn’t eat him. While hiding out in the cave, a goat named Amalthea watched over Zeus and as she was nursing him, he accidentally pulled off her horn. Zeus promised that the horn would always bring her what she wanted and from then on, it represented endless bounty.

These days, we’ve moved away from the goat’s horn and the modern day cornucopia is typically made out of woven wicker. Often florists place fall colored flowers inside, but our favorite stuffing is, you guessed it, food with the flowers. Our Thanksgiving table wouldn’t be complete without a bountiful cornucopia bursting with fresh fruit, crunchy nuts and of course, a little chocolate.

Will a cornucopia be on your Thanksgiving table this year?

Posted on

Art of Pave

My Favorite Style

Pave Floral Arrngements

Like so many of you lovely readers, I think of flowers as gorgeous little gems. I often identify my favorite style of floral design as “pavé”-style construction. In this week’s post, I wanted to share some prime examples of this compact and abundant, “flower-on-flower” look and describe some of its most valuable attributes.
Tips for Creating This Style of Arrangement
  • Try using one type of flower in varying shades.
  • Carefully clean stems so they are free of greens and foliage, leaving only the blossoms and stems.
  • Flowers should be cut so that the blooms fall just above the neck of the vase.
  • Work from the outside in — start by setting flowers in a ring around the edge of the vase and work row-by-row toward the middle. You will be begin to create concentric circles and the stems will form a “grid” in the vase.
  • With each successive layer of flowers, you will have more structure with the stems and you can use this structure to support the next layer.
  • Keep a “dome shape” in your mind’s eye and work to make the inner layers of flowers stand slightly taller than the outer layers.
  • Don’t be afraid of the flowers jutting out at an angle; with each new layer, they will stand a bit straighter and taller.
  • By the time you reach the middle, you should have a firm network of stems to support the taller flowers and they will stand straight up!
Image above: Garden roses in sweet peach and cream, including my peach garden rose obsession, “Juliet.” You might notice that this arrangement of garden roses doesn’t include greens or filler flowers. There is a purity to this design, yet the variety of colors within the soft spectrum and the range of rose types and shapes creates texture and movement. In this style, the technique is very accessible — simply clean the flowers of all greenery and cut them short so that the “head” of the blooms sit just above the “neck” of the vase.
Image above: An array of pavé-style arrangements viewed from above. These fresh green, purple and white arrangements are primarily single-flower, monochromatic arrangements made modern and sophisticated with a pavé design. Flowers above include roses, hydrangea, viburnum, ranunculus, hyacinth and sweat peas.


Image above: A “creamsicle” spectrum of carnations in pavé style. YES, EVEN CARNATIONS. I am a champion of the simple, fragrant and affordable carnation. In my view, the pavé style is never more effective than when used to turn an oft-overlooked “wallflower” into a sensation.
Image above: Icy chartreuse greens and whites arranged in a snug, clean design. Flowers include hydrangea, dahlias, roses, parrot tulips, snowberry and brassica cabbage. So modern! The pavé style allows you to use traditional flowers like hydrangeas and dahlias and still craft arrangements that could exist in the future 🙂
Image above: A riot of hot colors create a fabulous landscape. This arrangement includes ranunculus, parrot tulips, celosia, cabbage roses, hyacinth and a whimsical touch of jasmine. Don’t you want to take a bite out of these flowers? The pavé style allows you to truly appreciate and investigate the incredible blooms on the flowers in this arrangement. Let flowers like this speak (or scream!) for themselves by cutting them short and arranging them in this chic fashion.
Posted on

Spring Is Here Again – Early!

Spring Is Here Again – Early!

We are thinking of Easter Flowers and St Paddys Flowers and Mothers Day Flowers. We might be thinking of having some delivered anywhere close to Des moines, Iowa. Here is where you remember the The Wild Orchid and the wonderful designs they deliver, even after hours.

The wild orchid uses flowers over greenery to make our deigns “pop out” like they always do.  It is cheaper to use greens instead of flowers to make a  bouquet fuller; cheaper in any number of ways.  We do not do such things. Our flowers look full because they are healthy and fresh. Our bouquets see prettier because they are design to maximize their beauty and charm. Our gifts and chocolates are of the very best available.

We love spring..the sweet air, the warming winds and the the beginning of a new cycle. Stop and send the roses, friends…it makes Spring just that more memorable.

Go outside and feel the spring sun along with the cool breeze on your skin. See the flowers and hope they live through the next freeze. They have seen many many springs so maybe they will not be fooled this time.